使用自定义模板和示例项目开发LabVIEW项目 点击:424 | 回复:0

使用自定义模板和示例项目开发LabVIEW项目
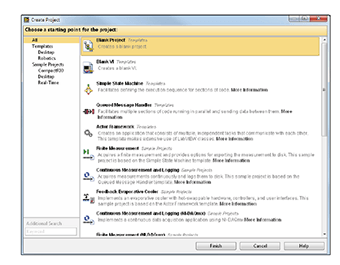
创建项目时,LabVIEW会显示创建项目对话框,以帮助开发人员选择可用作起点的模板或样样例项目。如果要将创建的项目用作自定义模板和示例项目,则须将每个项目的源文件和元数据添加到相应的LabVIEW目录中。然后,开发人员可以使用自定义项目作为开发项目的起点。
选择LabVIEW目录来存储自定义内容
LabVIEW在两个位置搜索要在创建项目对话框中显示的内容。选择最适合希望如何使用自定义内容的位置:
<LabVIEW>\ProjectTemplates—如果具有版本管理的托管代码实用程序(如VI软件包管理器)安装了自定义内容,请使用此位置。
<LabVIEWData>\ProjectTemplates—如果没有对<LabVIEW>目录的写入权限,或者想要为多个LabVIEW版本单源自定义内容,请使用此位置。
注意:LabVIEW对<LabVIEWData>\ProjectTemplates目录中的所有模板和样样项目执行版本检查。如果项目的.lvproj文件保存在LabVIEW的更高版本中的LabVIEW中,则创建项目对话框中会省略该项目。
组织<LabVIEWData>目录
首次将模板和示例项目添加到<LabVIEWData>目录时,必须创建子目录以确保LabVIEW可以找到内容。
完成以下步骤来组织<LabVIEWData>目录:
1. 在<LabVIEWData>下创建项目模板目录。
2. 匹配<LabVIEW>\ProjectTemplates目录的文件层次结构,以便存在以下路径:
<LabVIEWData>\ProjectTemplates\CategoryOverrides
<LabVIEW Data>\ProjectTemplates\MetaData
<LabVIEW Data>\ProjectTemplates\Source
储源文件
源文件由每个自定义模板和示例项目的.lvproj文件、库、VI和支持文件(如图像和文档)组成。
在“ProjectTemplates\Source”目录中为要在“创建项目”对话框中显示的每个项目创建一个子目录,并将每个项目的源文件添加到其各自的子目录中。确保没有子目录包含多个项目的源文件。
注意:
确保您的自定义模板和示例项目不包含任何自动填充文件夹。
确保您的自定义模板和示例项目不包含任何受密码保护的源VI。
确保源.lvproj中引用的所有文件都包含在其各自的子目录中。当开发人员尝试使用“创建项目”对话框创建模板或示例项目的实例时,缺少项目文件可能会导致问题。
创建和存储元数据
元数据定义“创建项目”对话框中显示的内容。LabVIEW可识别XML格式的元数据。XML文件可以包含一个或多个项目的元数据。
完成以下步骤以创建和存储自定义项目的元数据:
1. 创建一个XML文件并添加<元数据>标记。此标记包含所有元数据。
2. 为要在“创建项目”对话框中显示的每个项目添加<ProjectTemplate>标记。此标记包含每个项目的元数据。
3. 使用以下标记定义每个模板或示例项目。该表的“示例项目”列列出了使用每个XML标记的项目。请参阅<LabVIEW>\ProjectTemplates\MetaData\NILV_Core_TemplateMetaData.xml中的文件,了解如何定义现有模板和示例项目的元数据。
原文内容如下
UsingCustom Templates and Sample Projects to Develop LabVIEW Projects
Whenyou create a project, LabVIEW displays the Create Project dialogbox to help you select a template or sample project you can use as a startingpoint. If you want to use projects you create as custom templates and sampleprojects, you must add source files and meta data for each project to thecorresponding LabVIEW directories. Then, users can use the custom projects asstarting points to develop their projects. In addition to this document, referto the \ProjectTemplates directory to see how source files, meta data, andcategory overrides are stored for existing templates and sample projects. Usethese files as examples of how to create and store files for custom templatesand sample projects.
Selecting a LabVIEW Directory to StoreCustom Content
LabVIEWsearches for content to display in the Create Project dialogbox in two locations. Select the location that best suits how you want to usethe custom content:
§ <LabVIEW>\ProjectTemplates—Usethis location if a managed code utility with version management, such the VIPackage Manager, installs the custom content.
§ <LabVIEWData>\ProjectTemplates—Use this location if you donot have write access to the <LabVIEW> directory, or if you want to single-source the customcontent for multiple LabVIEW versions.
Note: LabVIEW performs a version check on all templates andsample projects in the <LabVIEWData>\ProjectTemplates directory. If the .lvproj filefor a project is saved in a later version of LabVIEW than the version currentlyrunning, the project is omitted from the Create Project dialogbox.
Organizing the <LabVIEW Data>Directory
Whenyou add templates and sample projects to the <LabVIEW Data> directory for the first time, you must createsubdirectories to ensure that LabVIEW can find the content.
Completethe following steps to organize the <LabVIEWData> directory:
1. Create the ProjectTemplates directory under <LabVIEWData>.
2. Match the file hierarchy of the <LabVIEW>\ProjectTemplates directory such that the following paths exist:
§ <LabVIEWData>\ProjectTemplates\CategoryOverrides
§ <LabVIEWData>\ProjectTemplates\MetaData
§ <LabVIEWData>\ProjectTemplates\Source
Storing Source Files
Sourcefiles consist of the .lvproj file, libraries, VIs, and support files, such as imagesand documentation, for each custom template and sample project.
Create a subdirectory in the ProjectTemplates\Source directory for each project you want to display in the CreateProject dialog box and add the source files for eachproject to their respective subdirectories. Ensure that no subdirectorycontains source files for multiple projects.
Notes:
§ Ensure that your custom templates and sample projects do notcontain any auto-populating folders.
§ Ensure that your custom templates and sample projects do notcontain any source VIs that are password-protected.
§ Make sure that all the files referenced in your source .lvproj areincluded in their respective subdirectories. Missing project files can causeproblems when developers attempt to use the Create Project dialogbox to create an instance of your template or sample project.
Creating and Storing Meta Data
Metadata defines the content that appears in the Create Project dialogbox. LabVIEW recognizes meta data in XML format. An XML file can contain metadata for one or more projects.
Completethe following steps to create and store meta data for custom projects:
1. Create an XML file and add the <MetaData> tag. This tag encloses all meta data.
2. Add a <ProjectTemplate> tag for each project you want to display in the CreateProject dialog box. This tag encloses meta data for eachproject.
3. Use the following tags to define each template or sampleproject. The Example Project columnof the table lists projects that use each XML tag. Refer to the file located at <LabVIEW>\ProjectTemplates\MetaData\NILV_Core_TemplateMetaData.xml to see how the meta data for existing templates and sampleprojects is defined.
XML Tag | Description | Example Project |
Required Tags | ||
<Title> | Defines the title of the project as it appears in the Create Project dialog box. | All projects |
<Description> | Defines the description of the project as it appears in the Create Project dialog box. | All projects |
<Filters> | Determines filters for the project, which allow users to filter items in the Create Project dialog box by category. Use a colon to separate categories and a semicolon to separate multiple filters. | All projects |
<LocationPath> | Specifies the path to the directory that contains source files for the project. Use a forward slash (/) as the path separator. | All projects |
<ListboxImagePath> | Specifies the path to the image you want LabVIEW to display beside the project title in the Create Project dialog box. Ensure that the dimensions of the image are 32x32 pixels. | All projects |
<ProjectPath> | Specifies the path to the .lvproj file for the project. If you set the value of the <CustomVIMode> to AfterPage1, this tag is optional. | Simple State Machine |
Optional Tags | ||
<Keywords> | Determines which keywords users can enter in the Additional Search box of the Create Project dialog box to search for the project. Use semicolons to separate keywords. | All projects |
<DocumentationPath> | Specifies the path to the HTML file you create to provide help for the project. If you use this tag, the project displays a More Information link after the description, which links to the HTML document. | Simple State Machine |
<CustomVIMode> | Determines when to run a custom VI during the project creation process. Select from the following values: § None—No custom VI runs. If you omit the <CustomVIMode> tag, None is the default value. § AfterPage1—After the user selects a project, the Create Project dialog box closes, and the custom VI runs. § AfterPage2NoUI—After the second page of the Create Project dialog box creates the project, the custom VI runs and completes. Then, the Create Project dialog box closes. § AfterPage2WithUI—After the Create Project dialog box creates the project, the Create Project dialog box closes, and the custom VI runs. The custom VI is responsible for showing or hiding its panel. | Simple State Machine, Blank VI, Actor Framework |
<CustomVIPath> | Specifies the path to the custom VI you want to run during the project creation process. If you set the <CustomVIMode> tag to None, LabVIEW ignores the <CustomVIPath> tag. | Actor Framework |
<SortPriority> | Determines the order of the project in the project list of the Create Project dialog box. | All projects |
<MetaDataClass> | Specifies the path to a class that defines custom behavior for the user interface of the second page of the Create Project dialog box. | Actor Framework |
<HidePrefix> | Determines whether to hide the File Prefix control on the second page of the Create Project dialog box. The default value is FALSE. | Feedback Evaporative Cooler |
<HideIconOverlay> | Determines whether to hide the icon overlay controls on the second page of the Create Project dialog box. The default value is FALSE. | Feedback Evaporative Cooler |
4. Store the XML file in the ProjectTemplates\MetaData directory.
Overriding the Sorting Order forFilters
Theleft pane of the first page of the Create Project dialogbox lists all the filters you specify in the meta data XML file. By default,LabVIEW lists filters you create in alphabetical order.
Completethe following steps to override the default sorting order for the filter list:
1. Create an XML file and add the <CategoryOverrides> tag. This tag encloses all category override data.
2. Add a <Category> tag for each filter for which you want to specify customsorting behavior. This tag encloses the name and sorting priority of eachfilter.
3. For each filter, create a <Name> tag and set the value to the name of the filter you usedin the meta data XML file.
4. For each filter, create a <Priority> tag and set the value according to the behavior you want.
The value of this tag is an index number, so a value of 0 places the filter atthe top of the list. Any parent filter for which you specify a value less than100 appears above the default parent filters, such as Templates and SampleProjects. If you specify a value for any child filter, the filter appears abovethe default child filters, such as Desktop.
5. Store the XML file in the ProjectTemplates\CategoryOverrides directory.
需要说明的是,上述的例程和文档,都是可以下载的,双击即可打开,其中压缩文件是可以采用粘贴复制的方式,拷贝到硬盘上。这不是图片,各位小伙伴看到后尝试一下,这个问题就不用加微信咨询了。有关LabVIEW编程、LabVIEW开发等相关项目,可联系们。附件中的资料这里无法上传,可去公司网站搜索下载。


楼主最近还看过
- xArrow组态软件
 [3123]
 - 请问:matlab里的simulink中间...[6643]
- DLT645 07版本通讯过程解析和...[13290]
- 三菱PLC编程,仿真软件下载地...[5213]
- 有需要三菱软件GX-Develop7的...[2519]
- 浙大中控先进控制软件[3100]
- 组态王中指定设备地址为1时,...[5792]
- 基于VC++开发串口通信的方法[6387]
- 国内首款不限点免费的组态软...[5371]
- 如何打开后缀为EXB的文件[2944]

官方公众号

智造工程师
-

 客服
客服

-

 小程序
小程序

-

 公众号
公众号


 工控网智造工程师好文精选
